Sunday, October 1, 2017

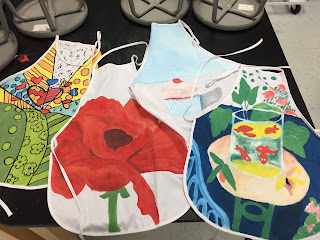
Art Aprons

I love seeing all the art teachers who show their passion for art through making their own clothes or the art teacher t-shirt fridays. I know their students must love to see what wearable art they are going to come in with next.

My version of that it my art aprons! I love to paint and I wear aprons all the time. I also like the option I have with putting on one with one class and then switching them for another class in the same day.

I buy my aprons at hobby lobby usually. They are pretty inexpensive and they are blank canvas to paint what I feel like.


Getting more aprons is definitely on my to do list. :)

Colorwheel Fun

CogAT, conferences, and field days, oh my!
It has been one super busy the last couple of weeks. I have had a ton going on in the art room lately as well.

I started introducing color to kindergarten and first grade making color wheels but in two different ways.

Since it is now officially Fall (even though it is not feeling that way in Ga), Kindergarten used liquid watercolor resist to create a spiderweb color wheel. I showed them a video clip off of youtube  that went over the color wheel and the order of the colors and then they were off to make their own.
Next, I wanted to get them into some paper sculpture and also move into the difference between two dimensional versus three dimensional. So of course, their spiderwebs needed a spider! I wasn't really sure what to expect but they were all really successful and turned out so well. They were perfect to  put on display for October.


First Grade began with introducing one of my favorite books, Mouse Paint. I love this book and they all really like it too. After reading them the story, I went over how to mix the colors and gave each table a plate with the three primary colors on them. They had to use their "art math" to mix the other three colors to make up their color wheels. They folded their paper into six sections and had to paint each section one of the six colors. We let those dry and then they were passed out the next day to create mice out of the painted paper. I gave them each a 12x12 piece of white paper to glue their mice to in the correct order. They added their mice and the details. Next, we talked about neutral colors and I let them pick a neutral color to create the other character that was in the story, the cat. I had them fold a 9x12 paper in half to  help them space out the parts of the cat to ensure they left themselves enough room room. On the top half, they drew the cat's head. On the bottom half, they drew a tail and the four paws. They cut them out and glued them around the color wheel to complete the project. They turned out soooo cute! I loved seeing all the different cats and their facial expressions.


Saturday, September 16, 2017

TGIF!

On a side note...

In between the clay projects that kindergarten and fifth grade were working on, I introduced my fourth graders to the art of Keith Haring. I had volunteers come up and strike a pose for us to sketch out in their sketchbooks in his style and I followed along drawing them on the board. They loved it.

After the class was over I looked up at the board and thought to myself that it looked like my Friday happy dance! :)

TGIF!

Clay: Pinch Pots and Emoji Shakers

It's time to play with some clay!

This week, I have Kindergarten making pinch pots and Fifth grade making Emoji Shakers. Long story short....I'm exhausted!:) But they are looking amazing and I can't wait to get them fired.

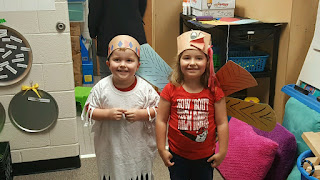
Kindergarten at my school celebrates Thanksgiving by inviting families to come eat lunch together but also has a performance that they do in their classrooms for the families before lunch. My kiddos were in kindergarten last year so I got to watch my daughter as a turkey and my son as an Indian. It was so cute.

The kindergarten teachers do a whole unit on the Native Americans so it is a great tie in to have them create pinch pots in the art room. 

They start with their own blob of clay. I have squares of fabric cut up for each student to work on so that the clay doesn't stick to the tables. (It happens to be red fabric and in one class, a boy looked at me as I was passing them out and said "oh no! did you cut up superman's cape!" - gotta love them! I never know what they are going to say)

Once they shape their blob into a ball, I have them give me a thumbs up. With that thumb int he air I have them stick that thumb into the ball of clay and show them how to pinch the clay and turn it to create the opening of their pot. 


The I demonstrate how they can change the opening into a different shape it they choose. They pinch three times for a triangle, four for a square, rectangle, or rhombus and I even show them shapes like a heart. It is a great review of shapes and a way to get them to make them their own and give them choice. I also pass out clay tools so they can practice drawing designs on their pot to add even more to them. 


Once I get them fired, I will give them a choice of fall colors to pick from for the glaze and do a second firing. They love to see them once they are out of the second firing and they are such keepsakes for the parents. 


The fifth graders will begin their shakers very similar to these. Since our school wide theme this year incorporates the emojis, I thought this would be a great thing to use for this project. 

They each started with their blob of clay as well. I had them pinch a small amount off first and told them to create ten small spheres about the size of a green pea  (you know like peas and carrots!-of course they didn't get the Forrest Gump reference) 


Next they took the rest of the clay and divided it in half and I went through the steps similar to kindergarten on how to create the basic pinch pot. I told them to keep in mind that they want to try to keep the opening of the pinch pots similar in size because they would be eventually putting them together. 


While they worked on that, I went around and gave each one a small paper towel. I had them tear it in small pieces to wrap the ten pea sized spheres and had them place them in one of the pinch pots. 


Next, they used a clay tool to score the lip of the pinch pots and added slip. They put the two pinch pots together and then they had to smooth the sides to hide where they joined the two pieces together. 


I reminded to poke a  small hole in the bottom and write their initials so I would know who they belonged too. I have a plate on each table and had them place them on the plate when they finished this step. That was done in one class period. (I have my students for 45 minutes and I keep them for four or five days straight before they rotate) I wrapped up the plates and stored them for the next day.


The next day they came in I went over additive and subtractive methods of sculpting. I pinched off a small amount of clay for each student so they could add parts of the emoji face on and they were given clay tools to use for the subtractive. I reminded them that if they were doing anything with additive or adding clay pieces to the shaker, they had to slip and score. They are looking amazing so far. I am very excited to see these out of the kiln. Once they are fired, they will be using paint to actually add color (I think the yellow glaze I have is not opaque enough for me for this.)  


 I will definitely add the finished results of the emoji shakers in a future post to show the final results. Now to plan what is up next and watch some football :)

Wednesday, September 13, 2017

Name Kaleidoscopes

Power is back on!

The last couple days have been interesting. Hurricane Irma went up through parts of Florida and up into Georgia so we lost power and had a lot of trees and power lines down in my area. We were actually out of school the last three days. With no power, I worked on some artwork of my own and got some examples ready for my next lessons.

My last post was about some of the fall themed projects I have going on but that is not all. I wanted to go ahead and dive into color schemes with third grade. One of my favorite projects for this is having them make kaleidoscope designs. In the past, I have had them done on paper but I have a ton of large coffee filters so I have decided to use those instead. I think these are easier to see through for the kids as the trace their design.

If you have not done these before, they are easy and the kiddos "oh and ah" when you fold up the design and show that the cool design is actually a name. They first begin with the filter and they fold it in half twice so that they have 8 sections.


 I cut out some white paper (6x6) and gave one to each student. I had them trace the filter while it is still folded into that pie piece and cut that cone shape out  of the paper to use to write their name (or intials) on.


They fill up the shape writing their name going from top to bottom. They trace the name with sharpie on both sides and then this will be used to trace their names onto the filter as it rotates around.


Once they have it traced all the way around, then it is time for the color schemes. We review the color wheel and the four main color schemes that we are focusing on for this project:primary, secondary, warm and cool. They must pick one to use for their design. We also discuss tints and shades and they can also choose to use tints and shades of the three colors in the scheme to color in the design. They are told to keep their design symmetrical and if they color one shape of their design with a color, that they should use it for all of those shapes. My example is cool!
They all are successful and they are beautiful on display as well! And since they are in that circle shape, I could have even used these for Dot Day. I may keep that in mind for next year. 

Tuesday, September 5, 2017

Fall Projects

Back from the holiday and full steam ahead! And a full moon:)

The weather is not feeling like fall yet but I wanted to start creating artwork that would be ready to put up for display for when it does. I began with first grade. Owls always make me think of fall (I am not sure why) so I had them begin with the background. Van Gogh is a favorite of my students(His artwork was the winner of our March Madness bracket last year which I will talk about again later). I showed them examples of his work and discussed his style where he created short dash marks with his brush and focused on Starry Night. I gave out light blue paper and oil pastels and had them create their own night sky.
The next day, I gave them model magic and showed them step by step how to create the owl shape and how to add in texture as well. (I LOVE my ladybug doc camera- am I alone on that??)
Then, they were put up to let dry.


The third day, it was time to put it altogether. They added color to their owl with marker (one reason I LOVE model magic too, especially for little ones.) They cut a tree shape out of brown construction paper and leaves out of two different values of green. We also discussed  how line can create implied texture so they added lines onto the tree. When they had the owl and their skies complete, they turned them both into me and I hot glued the owl on. There was a lot going on with this project but they all did a great job and it hit all of the Elements of Art. It will definitely be marked done as one of my favorites. I love a project where every student is really successful.

Another Fall related project that we started this week with second grade were these Positive and Negative Pumpkins. I have done projects like this before but I added to it this time because my students also really like zentangles. I spent the first day going over positive and negative space as well as what symmetry was. I gave out 12x18 balck paper and 9x12 orange paper. They drew out half the pumpkin shape in pencil and one eye, half the nose, and half the mouth.

The second day, we discussed line and showed them several examples of lines and zentangles. They used black on the orange paper and white or orange on the black paper.
Kind of spooky but very cool and another one where everyone was very successful! :)

I hope these have helped you get into that fall/autumn mood and I will post more soon!

Sunday, September 3, 2017

Kindergarten favorites

You have to love football and a three day weekend! This holiday weekend has come along at the perfect time and it has been so nice to feel like I have some time to do the mountain of things on my to do list. First thing on my list...watch my bulldawgs play! :) And it was a win so that made the day that much better. I love watching football with my family and my kiddos.
The second thing on my to do list was to work on my supply orders. I am very lucky to be in a large county that has a supply warehouse where they buy in bulk which discounts a lot of what we need and want. I am also lucky to be in a small school (in comparison to other schools in my large county) that also supports the arts and allows me to have a budget where I can get what I need and want for my classroom without much problem. I am still a penny pincher and I am always looking for a great deal so it still took me quite a while to figure out what the best things were to purchase and what deals or coupon codes I could use. I will have to share some of the new products that I am trying when they come in and I will let you know what I think about them. 

Another thing on my to do list was to write on this blog. I am apart of several art teacher groups on facebook (and if you aren't yet, you should! One of the best things I've done in a while) and there has been a bunch of discussion about kindergarten. What are some of the best projects to do with them? and how do you even make it through the class with them?? 

Although kindergarten can be in the most exhausting class, it is one of my favorites. I feel like a performer because I do a lot of song and dance to keep their attention but it also helps keep information in the brains. I have a mat in the front of the room where they start class each time and it is the only grade level that I use it but it is also something I can not live without. It makes a huge difference for them. I tried one year to not start with the mat or rug and it was so much more difficult. I love to start off with a children's book or song or even a video clip that I can connect the lesson to. It gets their attention and it can break up the time a little too. 

I also use a lot of "repeat after me" too. I go over directions several times and use my "art people" magnets (which I added pictures of in an earlier post) on the board so that they always have a visual reference to go back to if they forget the next step. Having those visual ques are a huge help for me to keep from repeating things over and over but also for them because I think it gets them to be more independent and not relying on me for every single thing. 

So along with those tips, I also want to share some of my favorite kindergarten lessons. Since my own kiddos were in kindergarten last year, these are some of their pieces :)

First lesson I start with each year is my dot day lesson after reading the book The Dot by Peter H Reynolds. It is great because it reminds them to write their names on their papers and it moves them past the "I can't."
These were made with different sized circle lids printed on white paper after they were dipped in different color tempera paints. Then we talked about different kinds of lines and they used markers to add them to the circles once the papers were dry. After that, they given golden yellow paper to use as the frame and they have to sign their names. 

Another favorite is the Gingerbread man. We have several books about the gingerbread man at home because it is a favorite of my daughter. I like this lesson because it goes over positive and negative space which is a hard concept for little ones. 
I gave out red and green tempera paint with q-tips along with people stencils that I made out of tag board. The stencil was the positive space and they dot painted the negative space. Once the paint was dry, they used pencil to sketch out what the gingerbread men looked like, they outlined with sharpies and then used oil pastel to color them in. They were a cute winter activity.

The last one that I will share for now, is what I had them create for our Fine Arts Night last year at our school. It was a tie in with Georgia Okeeffe and with symmetry.
They viewed images of Okeeffe's flower paintings and we talked about how she painted them very close up so they drew their own flower as big as they could. They were outlined and painted using tempera cakes. The next day, they were given coffee filters and markers to create the wings of butterflies. We talked about symmetry and folded the filters in half so they their designs would go through to the other half too to be symmetrical. The were given twisteez wire and beads to make the bodies of the butterfly and then we added the wings. I hot glued them to their flower paintings. (This is  a picture of my son pointing to his- I'm a proud art teacher momma!) They tied in perfectly to the kindergarten end of the year parties too because our kindergarten teachers teach manners and different dances to the students and they end the year with a Butterfly Ball. It was adorable! 

I have many more projects to share so I will post again soon! Hope everyone enjoys the three day weekend!

Art Aprons